Fileify Studio: The Complete Pro Studio Guide
Fileify Studio is the Pro side of Fileify: multi-document projects, organisation-wide brand kits, a tool-driven AI agent and per-organisation billing. This guide walks you through the interface page by page — from defining a brand kit to exporting PDFs, with the agent dialogue and manual editing in between. Plan about ten minutes for a complete tour and to start your first branded booklet.
The sidebar: your anchor
Once logged in, you land on Projects. The left sidebar has only four entries — Projects, Brand kits, Credits, Settings — plus the Organisation credits counter at the bottom, which shows your organisation's live balance in euros (here 99.4087 €). This balance is shared across every Pro member of your organisation and is debited on every LLM call or image generation.
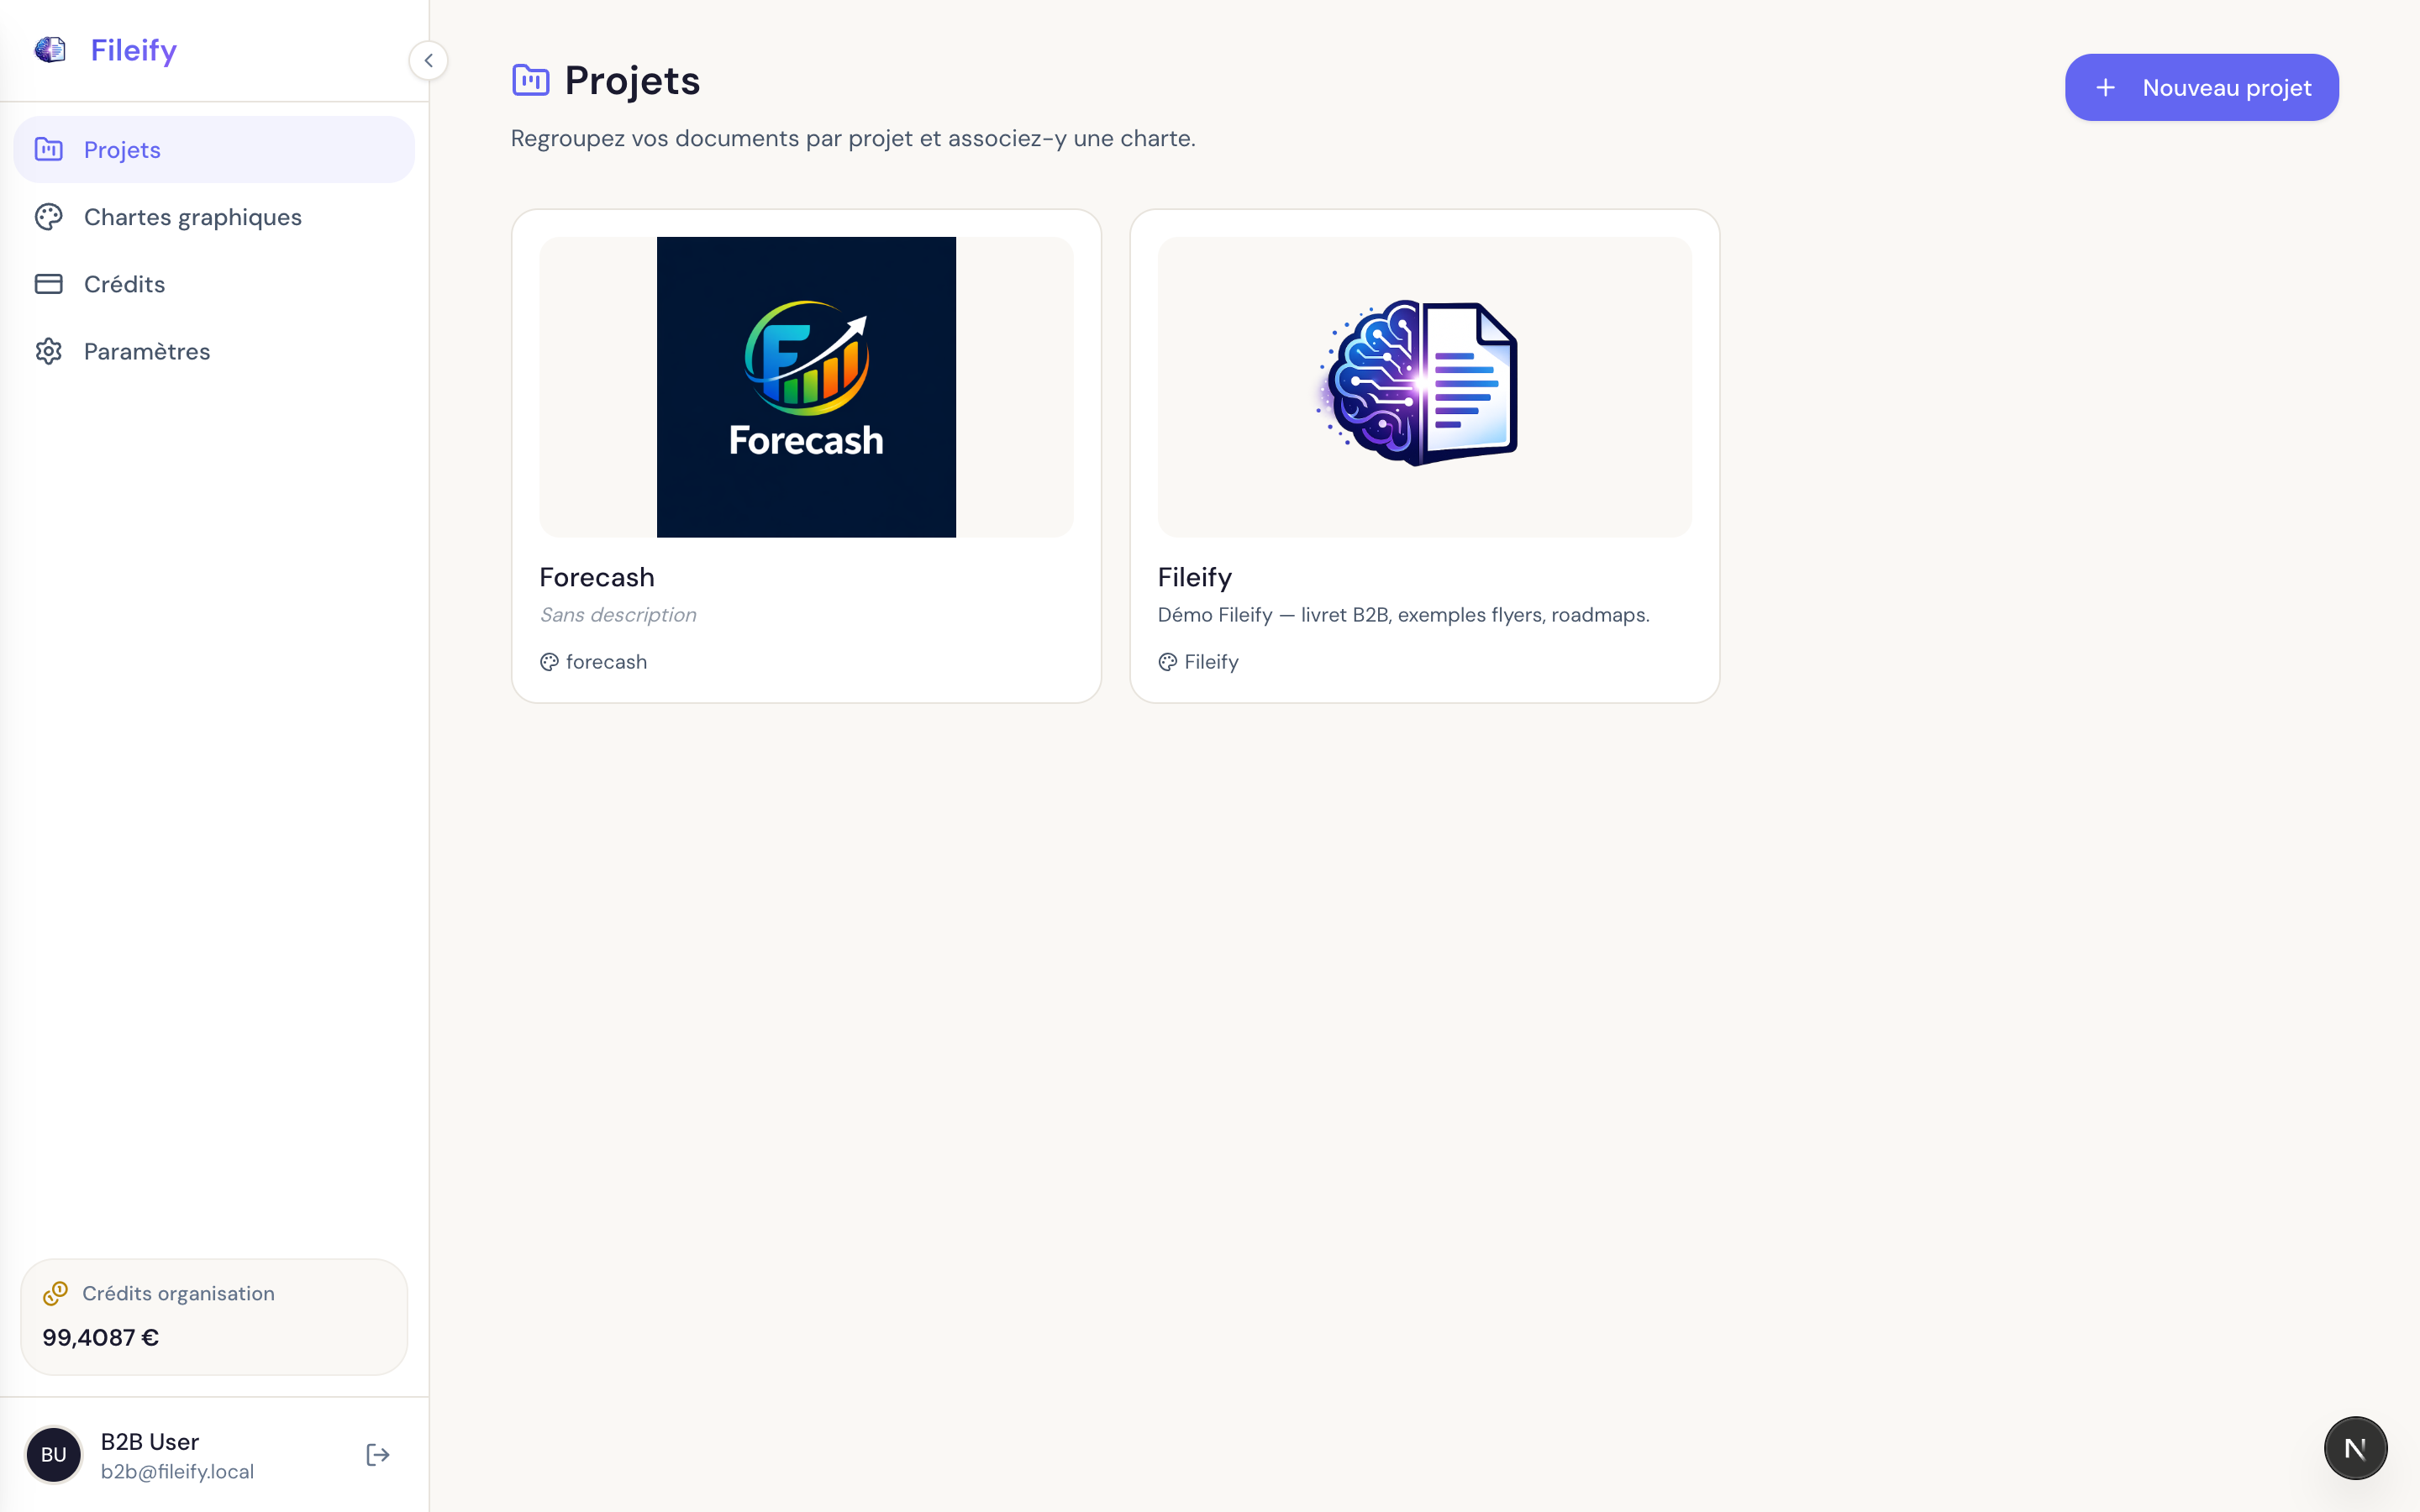
The New project button (top right) opens the create form. But before you go there, the right reflex in the Studio is to capture your visual identity in a brand kit — it saves you from re-styling every document afterwards.
Step 1 — Define a reusable brand kit
Head to Brand kits. This is where you capture your visual identity once and reuse it across every future project and document.
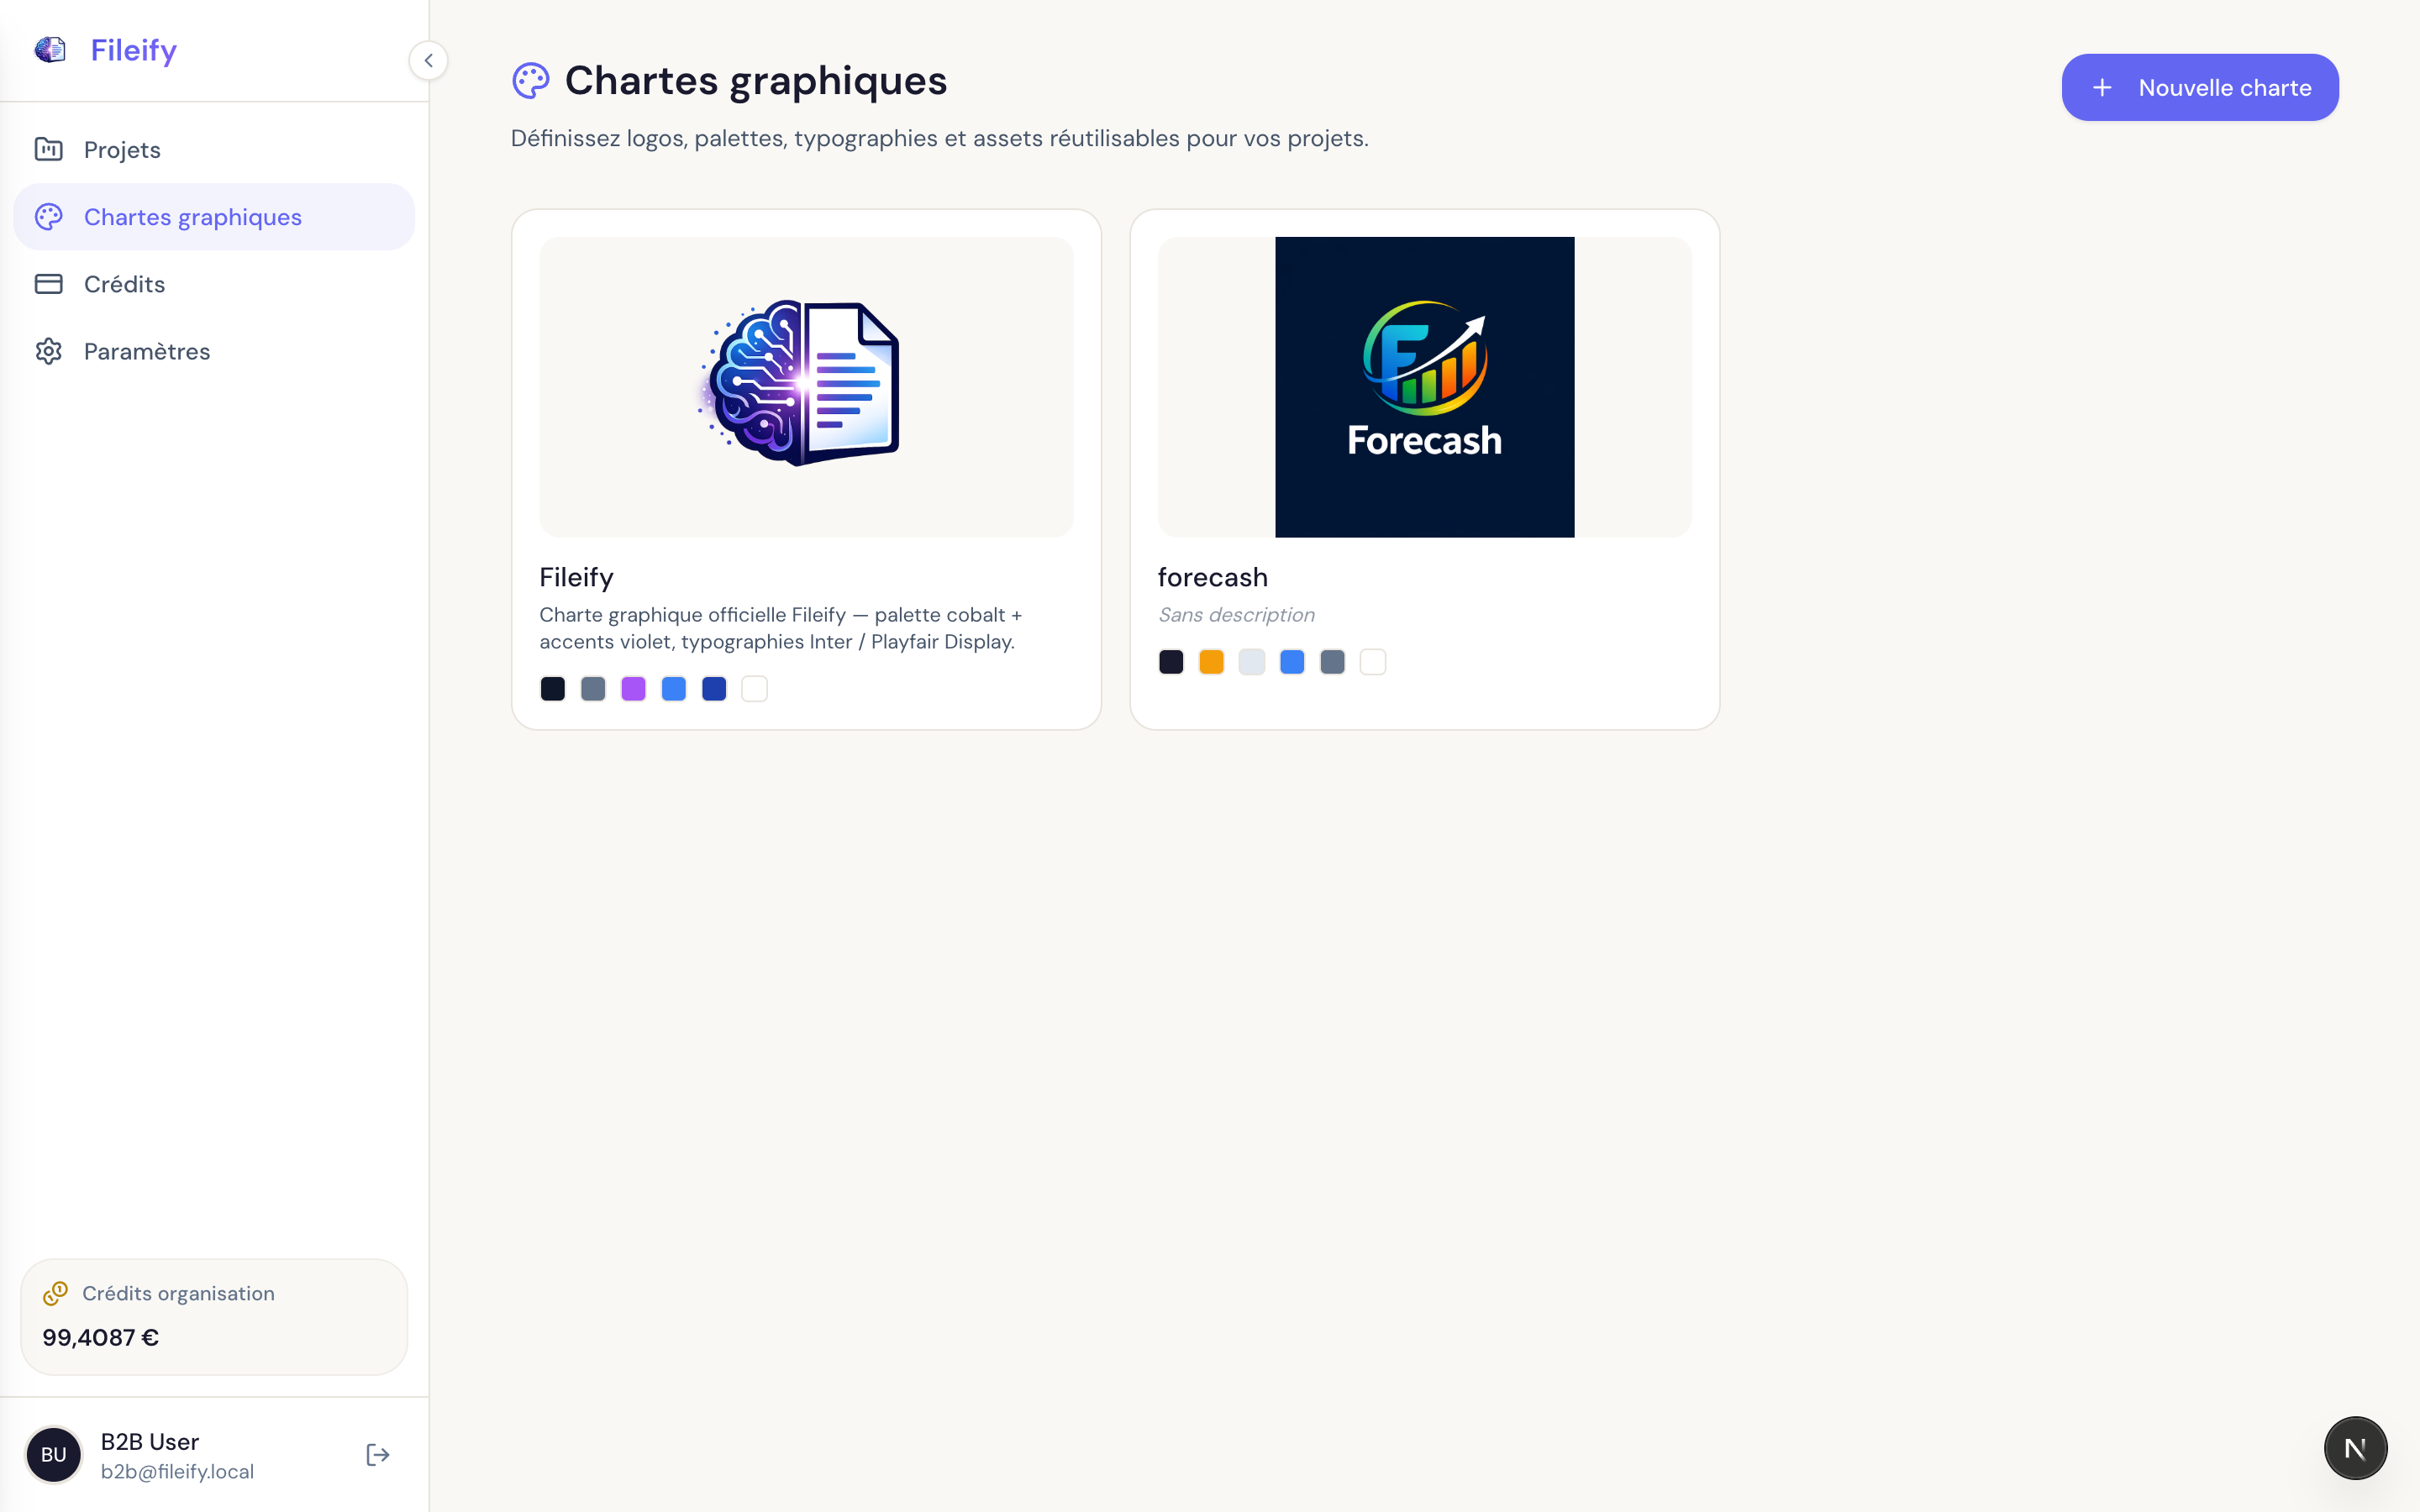
A brand kit groups four families:
- Logo — your main mark, in PNG/JPEG/WebP/SVG (5 MB max). The agent places it on covers, headers, signatures.
- Palette — your colours named semantically (
primary,accent,text,muted, etc.). The agent reuses them as CSS variables in the generated HTML. - Typography — title and body fonts, imported from Google Fonts or added manually.
- Assets — images, illustrations and pictograms you want reused across multiple documents.
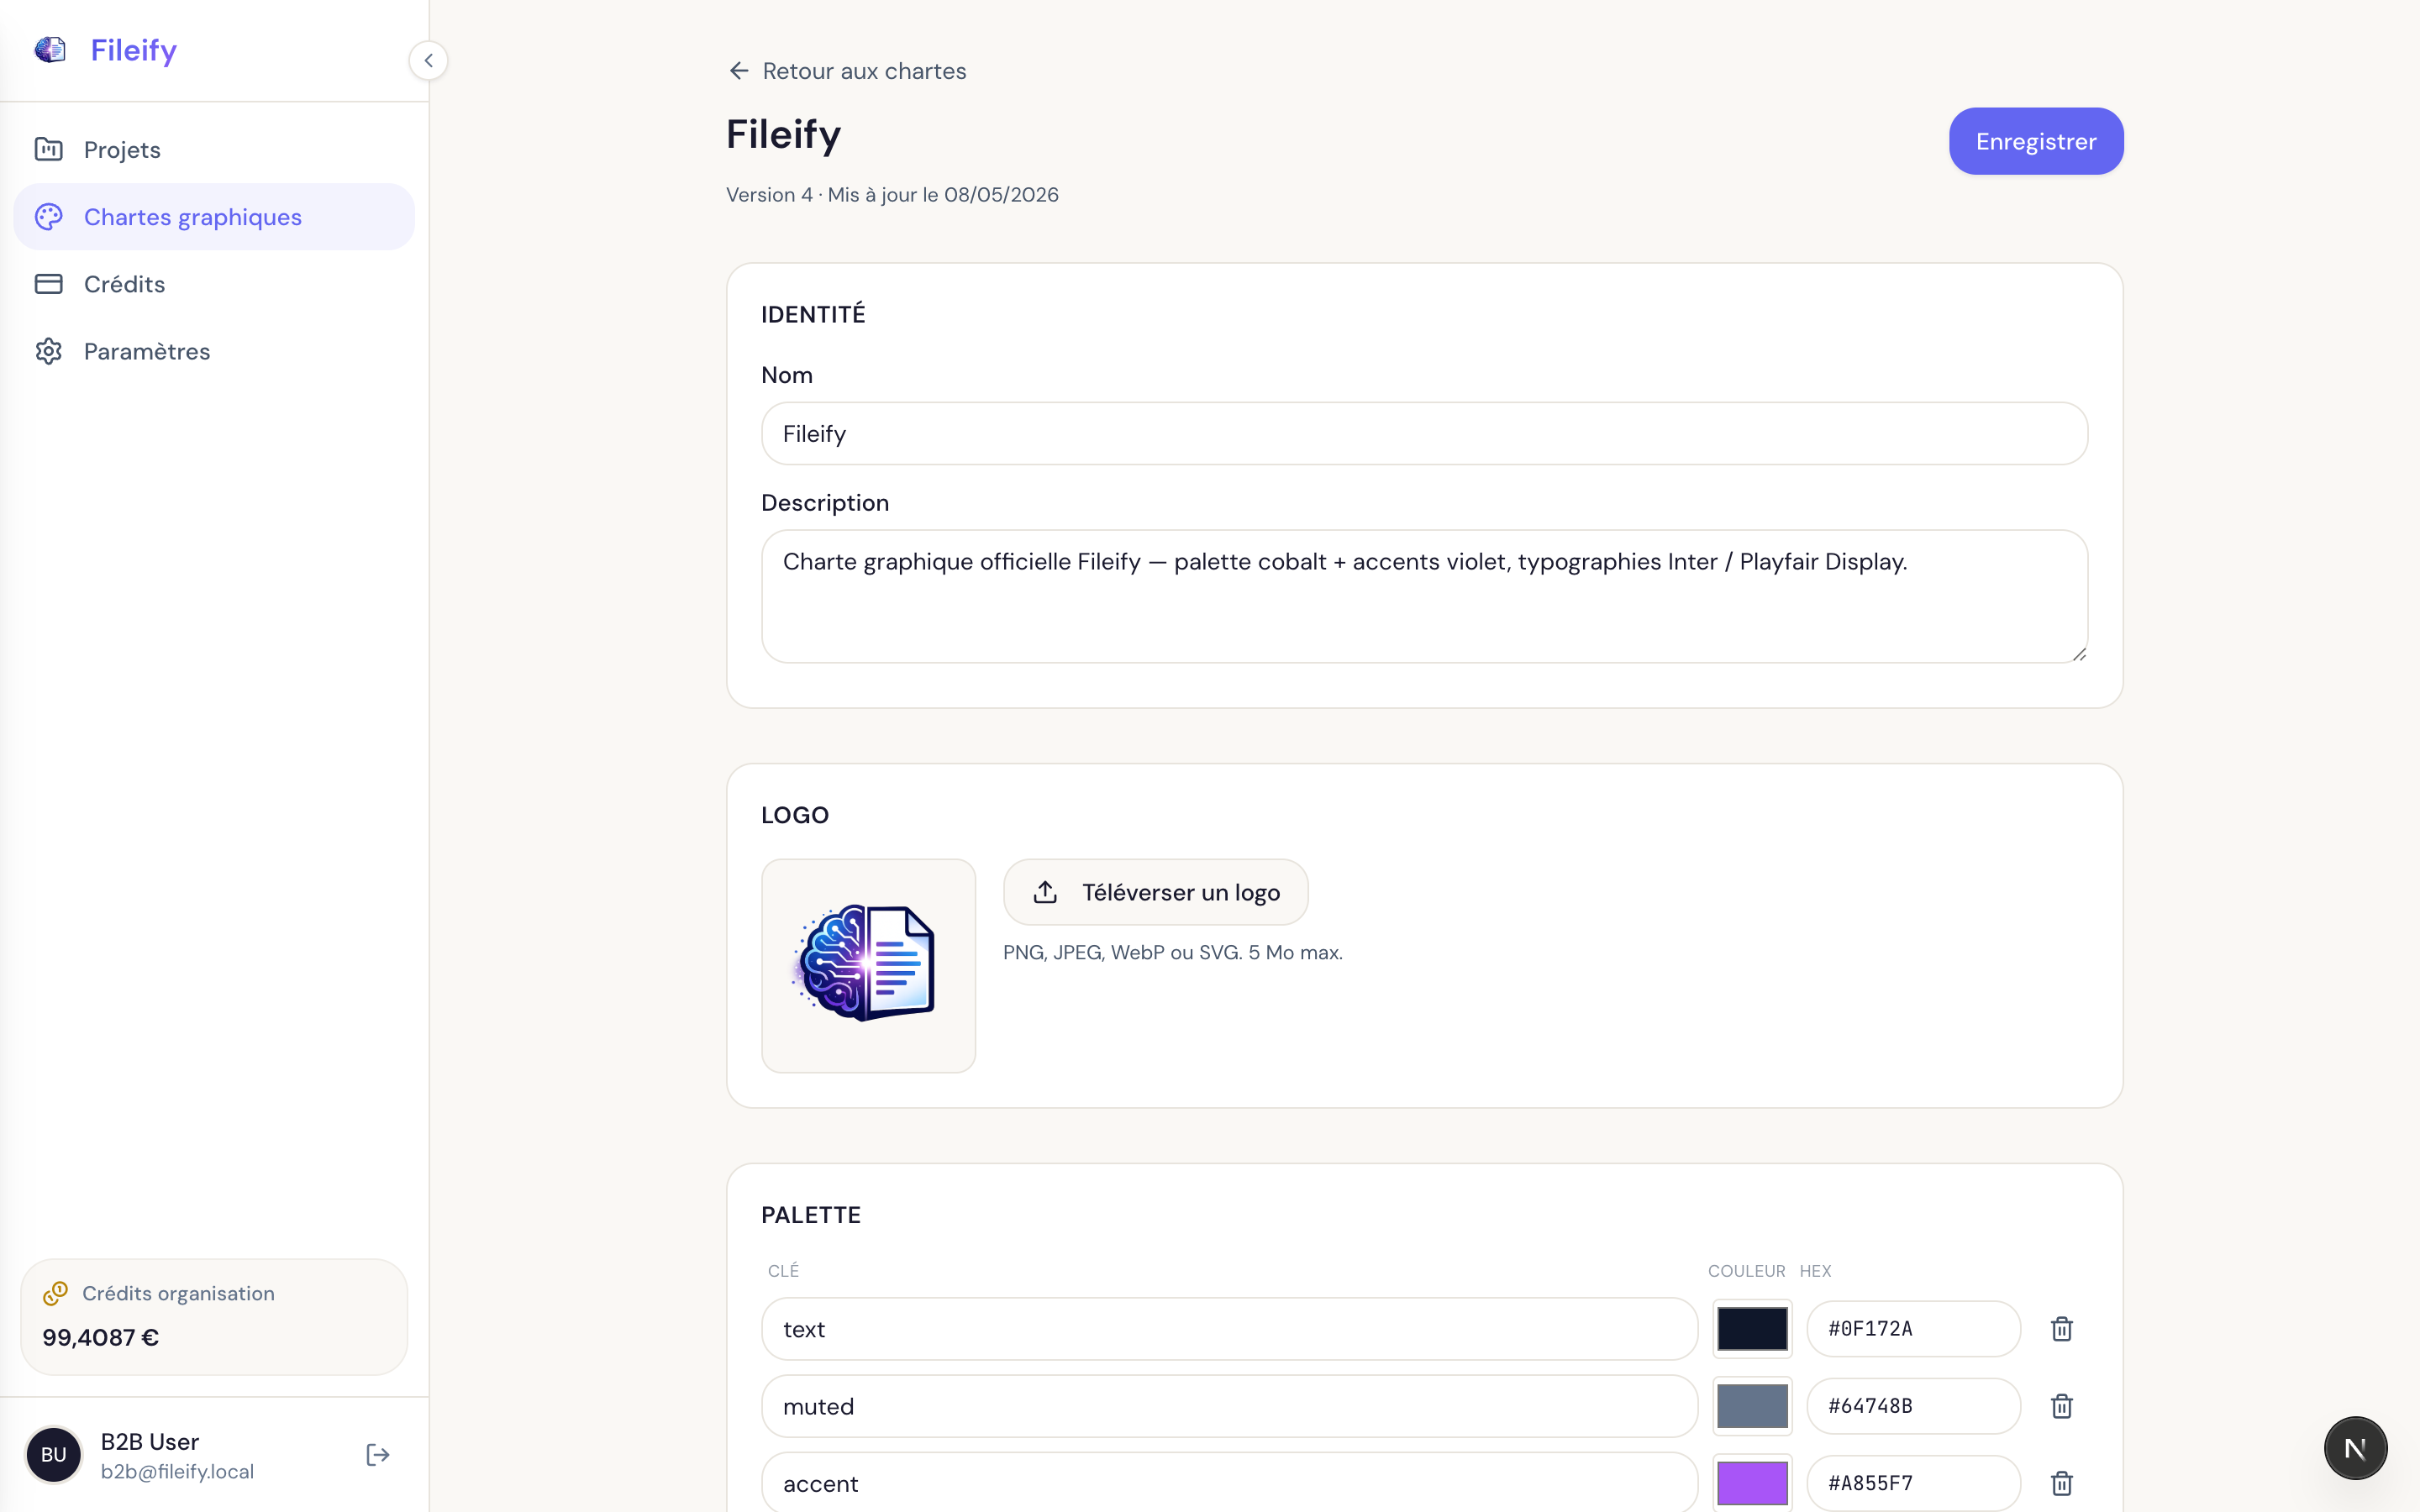
A good practice: name colours semantically rather than literally. primary rather than blue, accent rather than purple. The day you rebrand, you edit the kit once and every existing document picks up the new palette.
A brand kit is versioned: every save bumps the version number and tracks an updated-at date. You can therefore tweak the palette safely without breaking an in-flight project.
Step 2 — Create a project and link it to your brand kit
With the kit ready, head back to Projects and click New project. A project is a container: it groups a brand kit, a textual brief, and every document that flows from it (flyers, booklets, roadmaps, menus, business cards — anything goes in the Studio).
Click the project card to configure it. You'll find three main sections:
- Identity — name, description, linked brand kit
- Linked brand kit — visual recap of the kit (palette, typography)
- AI models — per-project override of the models the agent uses
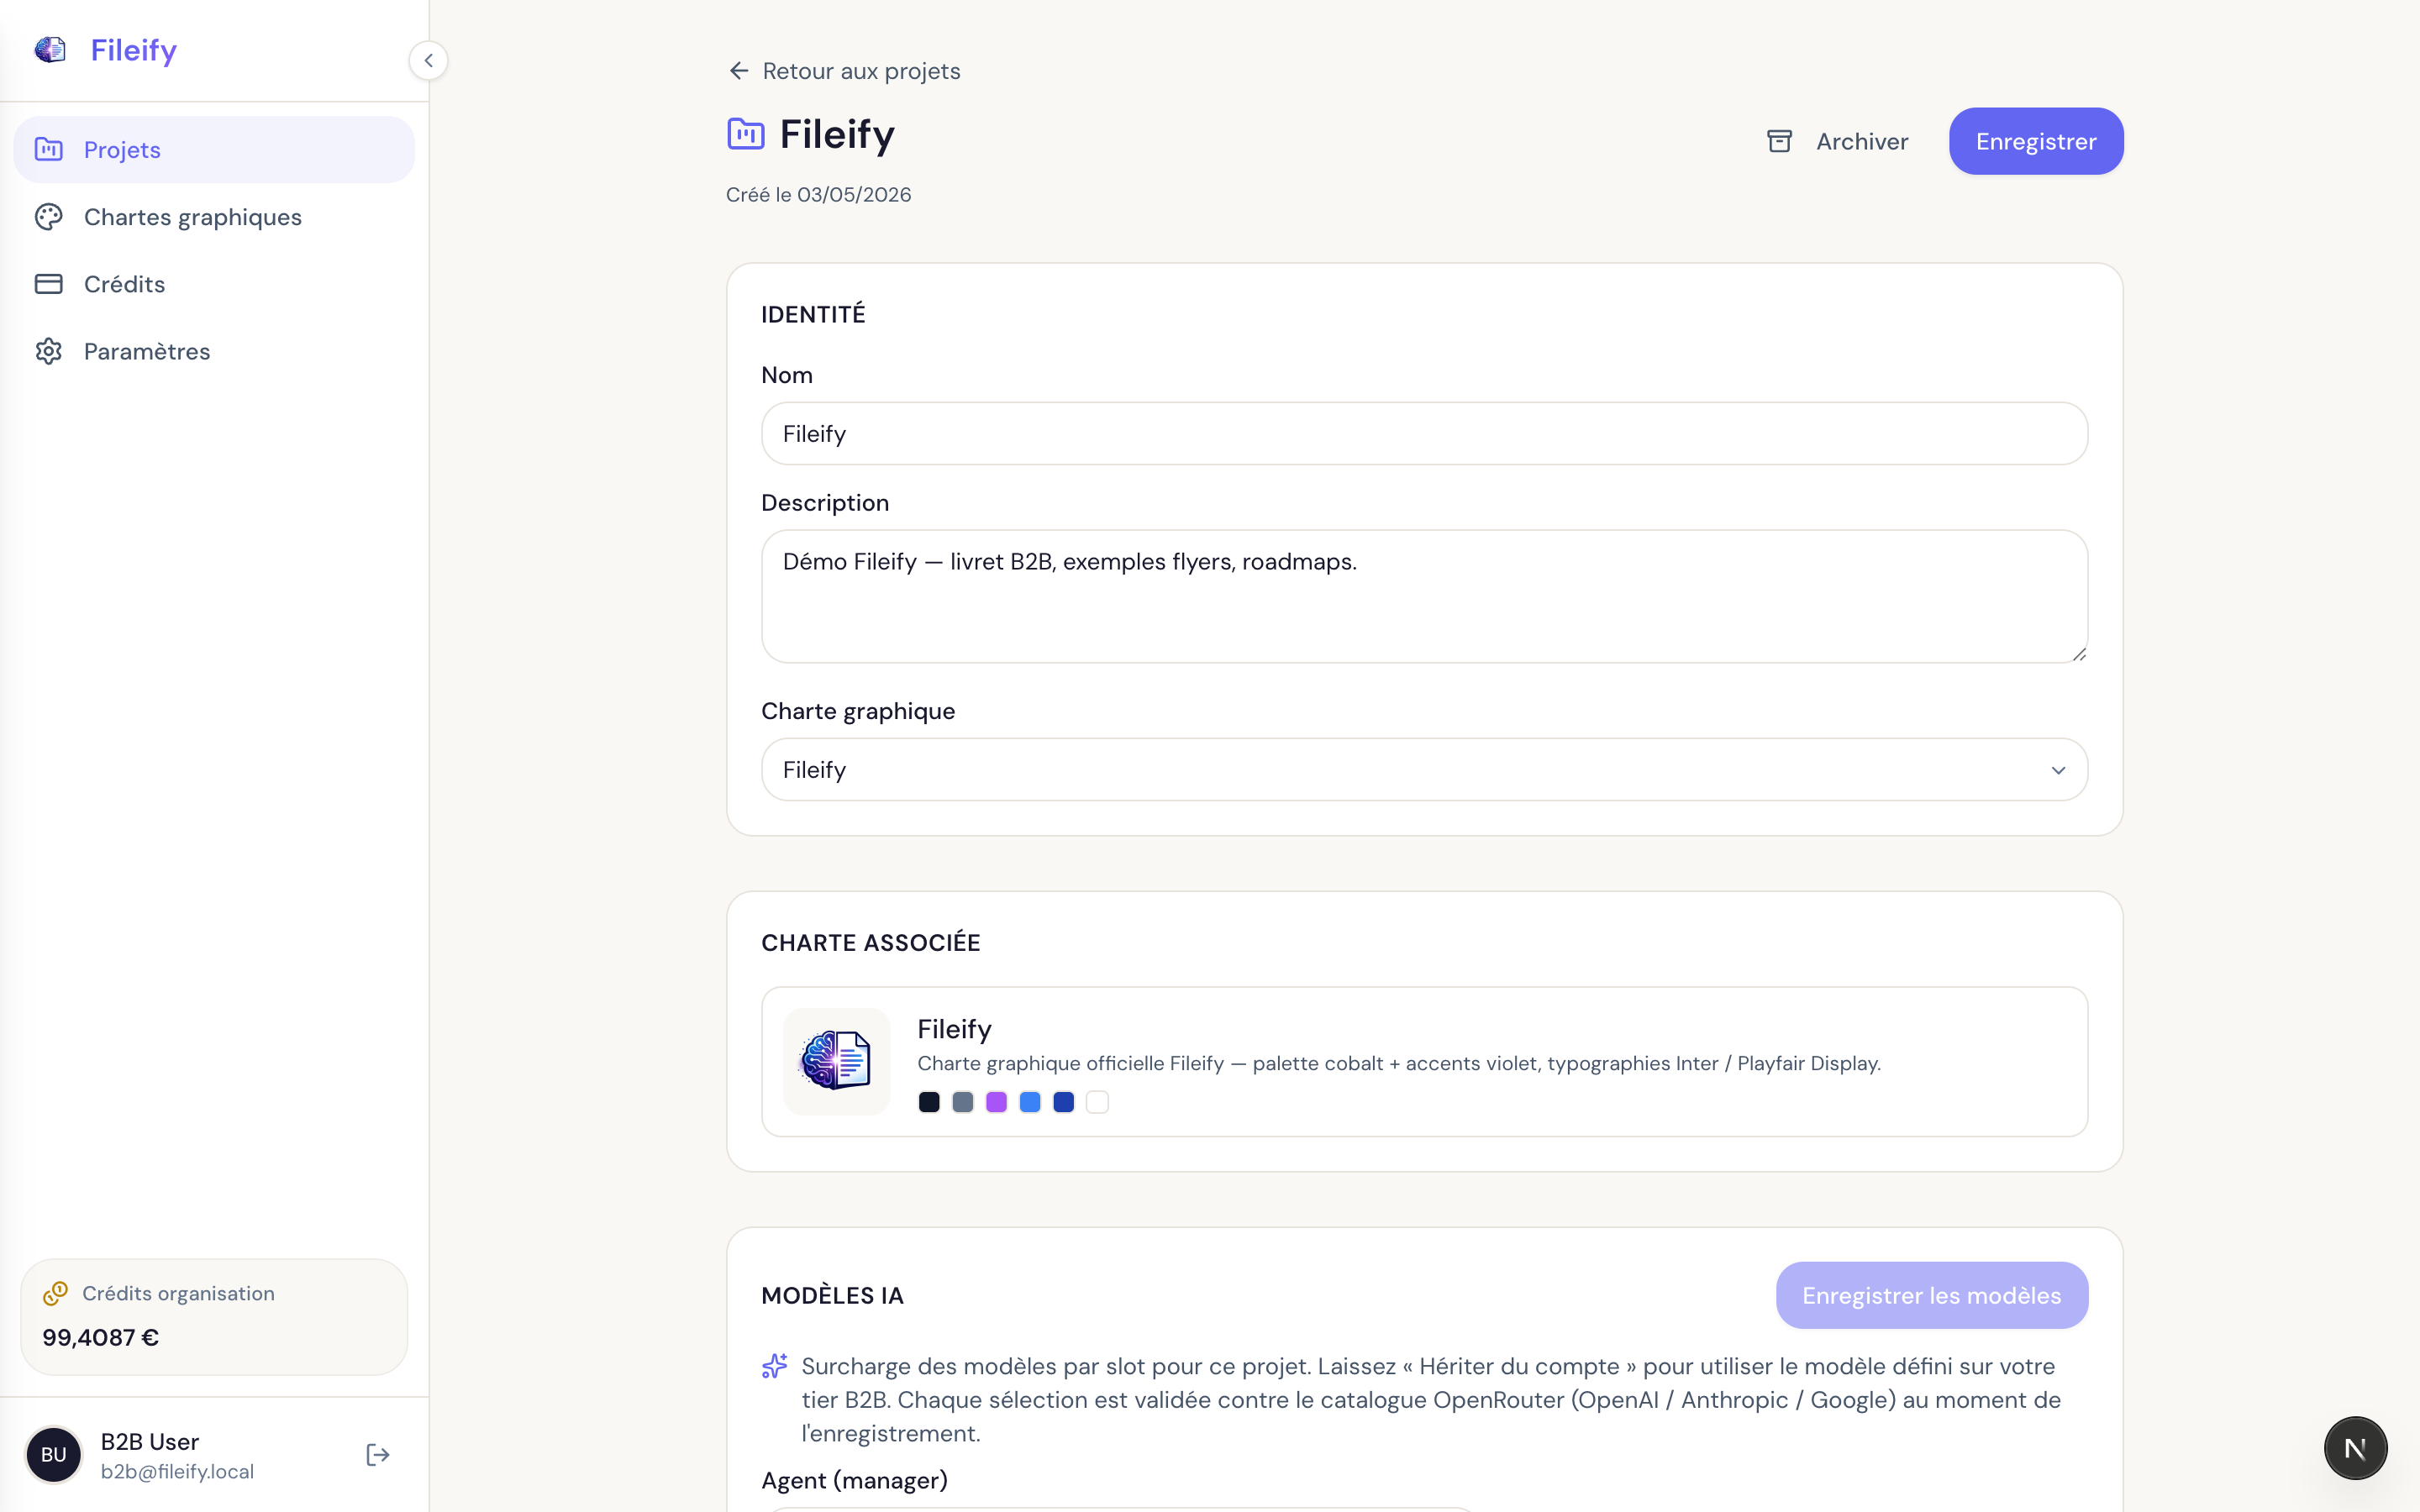
Linking the brand kit you just created automatically gives the agent your brand colours, fonts and logos. Every document generated inside the project will then be styled consistently, without you having to repeat the brand details in each message.
The AI models section overrides your Pro tier defaults (manager, html_author, image, compaction) at the project scope. If your organisation has a precise preference — Claude Opus for HTML authoring, GPT-5.4 for orchestration — set it here. Otherwise, leave each slot on "Inherit from account" and the agent will use your tier defaults.
Step 3 — Talk to the agent inside a document
Open a document from the project page or create a new one. The Studio editor splits in two columns:
- Left — the canvas displaying the document pages (a Pro booklet can run to dozens), with the toolbar (zoom, pagination,
ScrollorPagemode). - Right — the Agent panel where you talk to the agent.
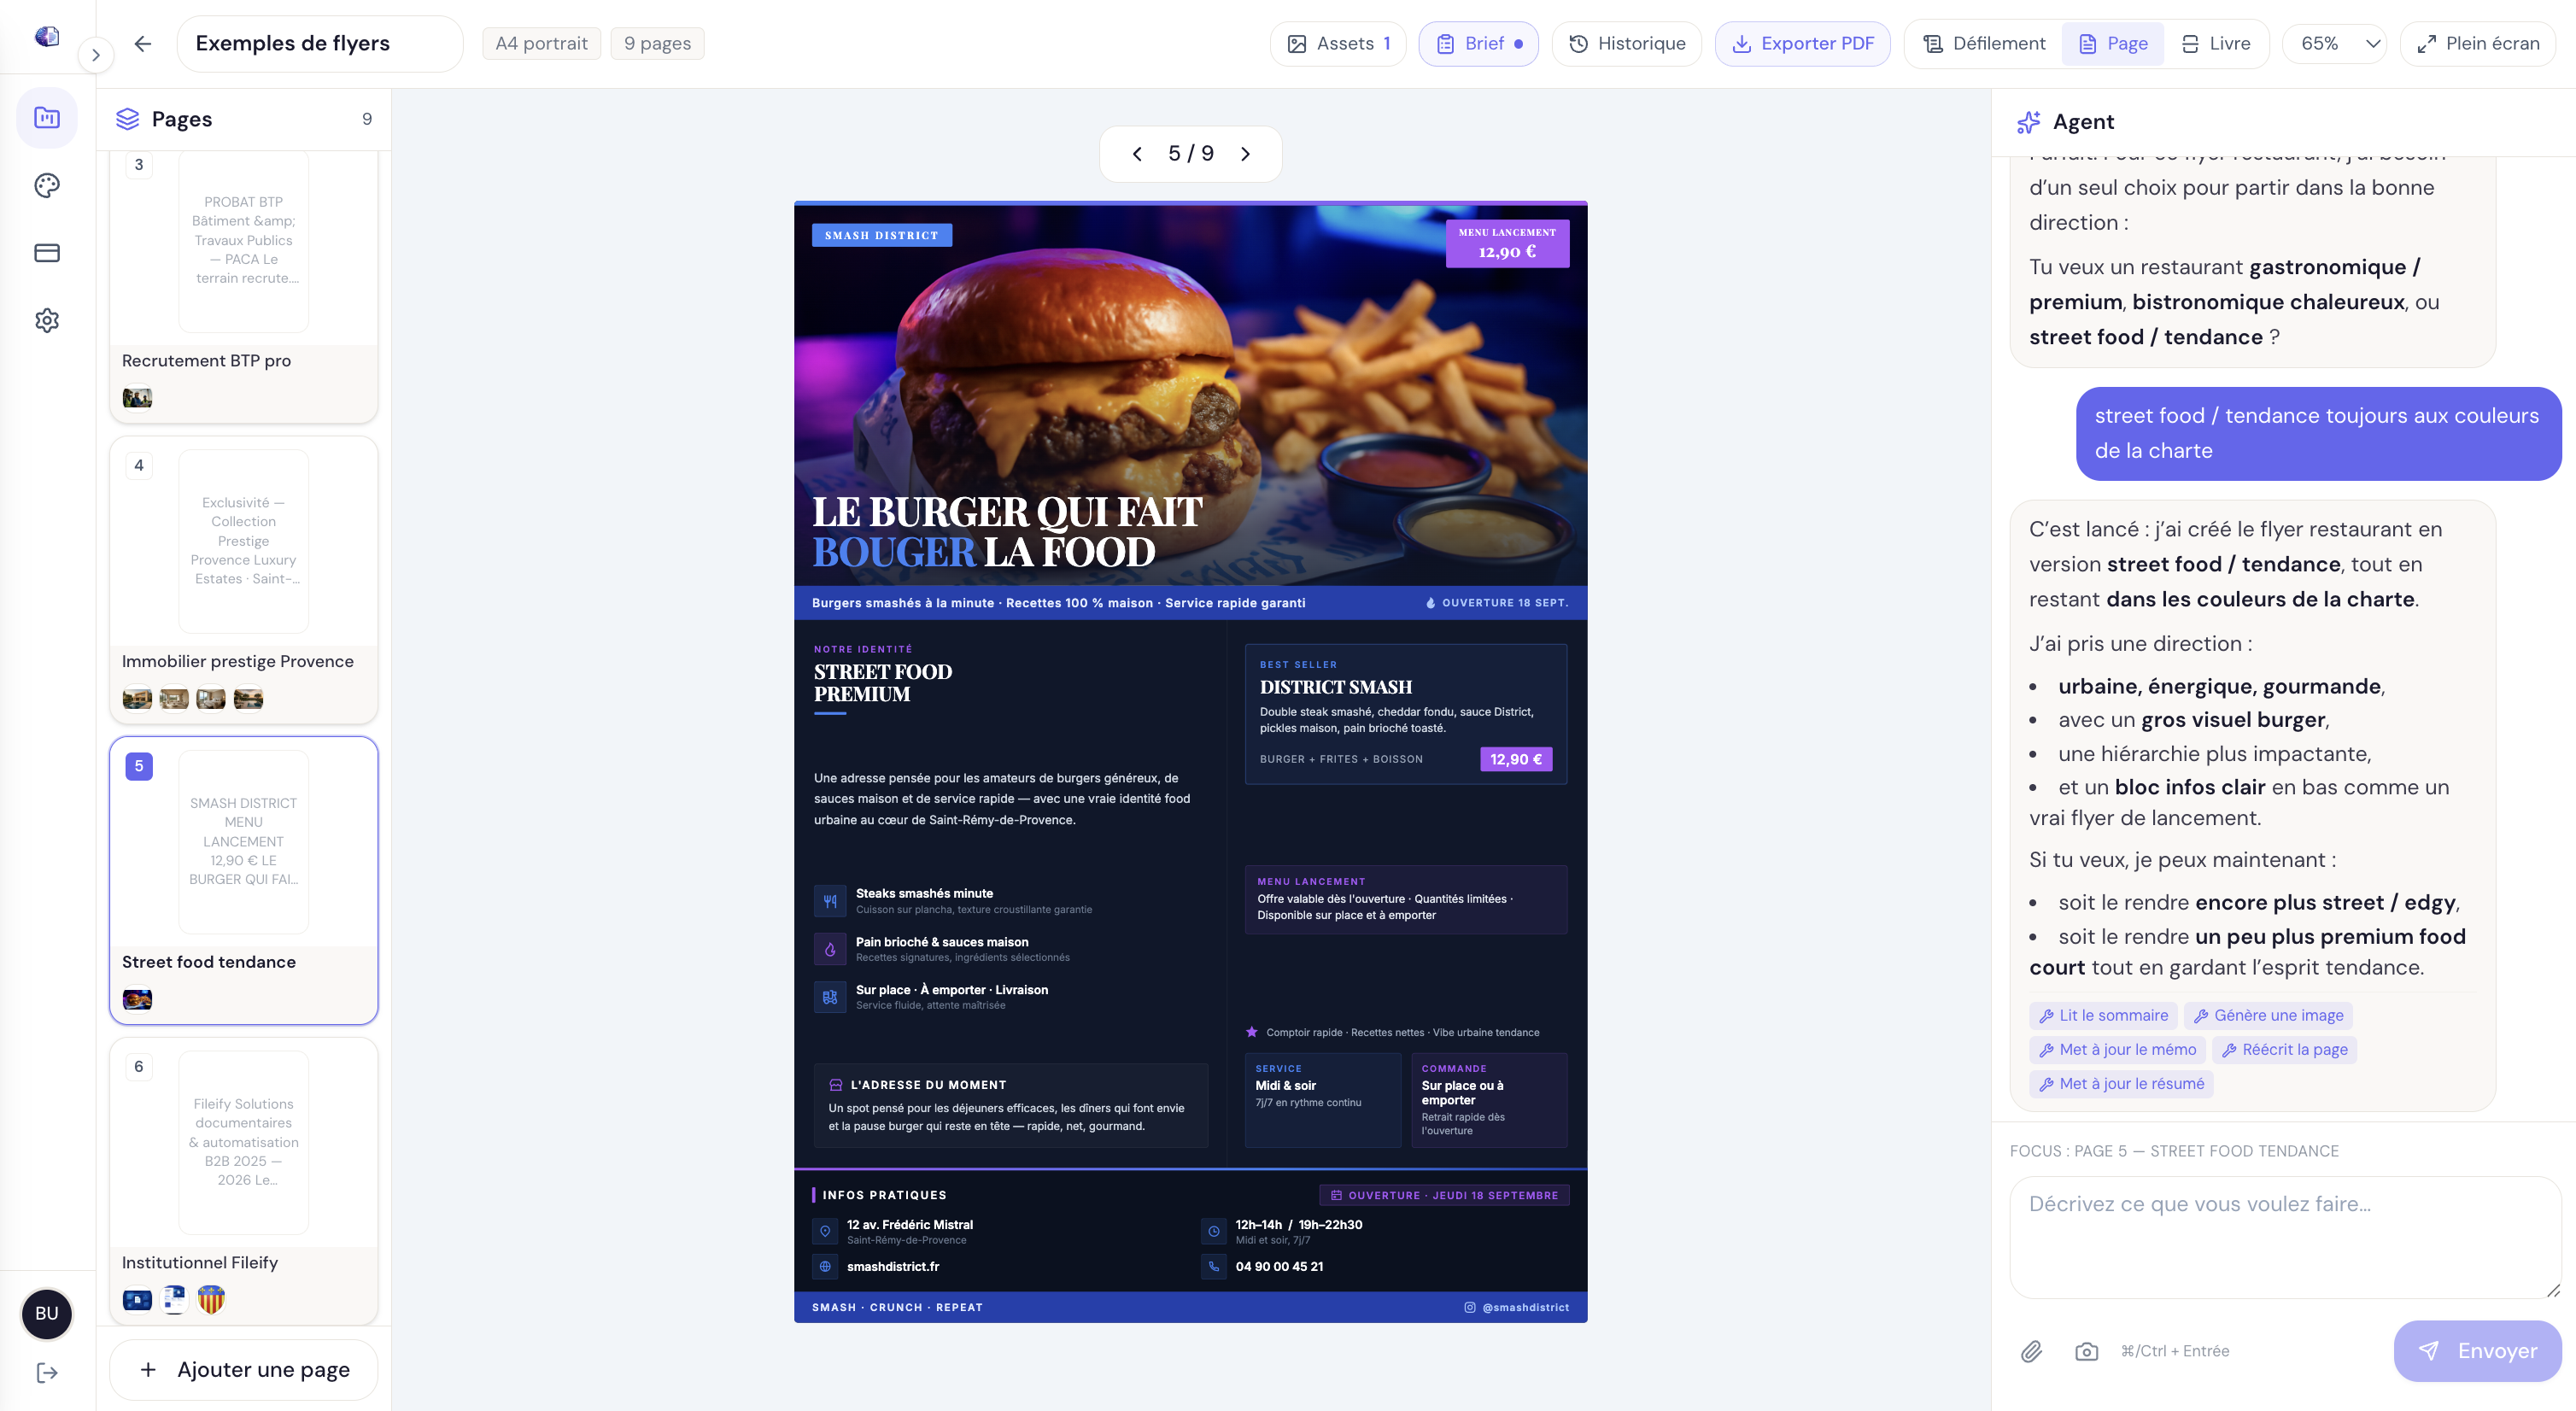
The Studio agent isn't a plain chatbot — it has tools it invokes on your behalf to mutate the document. The main ones:
add_page— adds a page at the requested position (title, intent, kind)edit_page— rewrites an existing page's HTML based on a free-form instructiondelete_page,move_page— manipulate the structuregenerate_image— produces an illustration via the configured image modelset_brand_kit— attaches or detaches a kit from the documentupdate_project_memo/update_document_memo— pins persistent notes the agent re-reads on later turnsview_outline— the agent inspects the current structure before acting
A few prompts that work well:
- "Build a 6-page booklet for our Q3 roadmap: cover, table of contents, three strategic pillars, contact page"
- "On page 4, replace the visual with a generated illustration of a satellite in orbit"
- "Rewrite page 2 keeping the same title but switching to a more formal tone"
- "Apply the Fileify brand kit to the whole document"
- "Note in the project memo that we never use yellow in our designs"
The agent runs an agentic loop: it calls its tools, reads the results, re-prompts the LLM, and only sends a final reply once the document is up to date. You see the chunks stream into the right panel as it works.
Step 4 — Manual page editing
Once the agent has done 90 % of the work but you want to nudge a specific text, move a block, or change a colour without dialogue, click Edit at the top right of the editor. You enter manual editing full-screen mode: pages become visually editable, you can pick any element (text, image, block) and edit its styles in the right panel, or click a text to rewrite it in place.
Three typical use cases:
- Fixing a typo or rewording a phrase — quicker than messaging the agent
- Moving a block by drag-and-drop — when the agent has placed it where you want to nudge it
- Selecting an element as agent context — one click on a block, then you switch back to chat mode and the agent knows exactly what you're talking about
Every manual edit syncs back to the agent: your next message resumes from the edited state, never the pre-edit version. The Save button persists the changes, and the rendering stays faithful between the on-screen preview and the PDF export.
Step 5 — Track credit consumption
Head to Credits. This page does two jobs: show the current organisation balance and detail every debit.
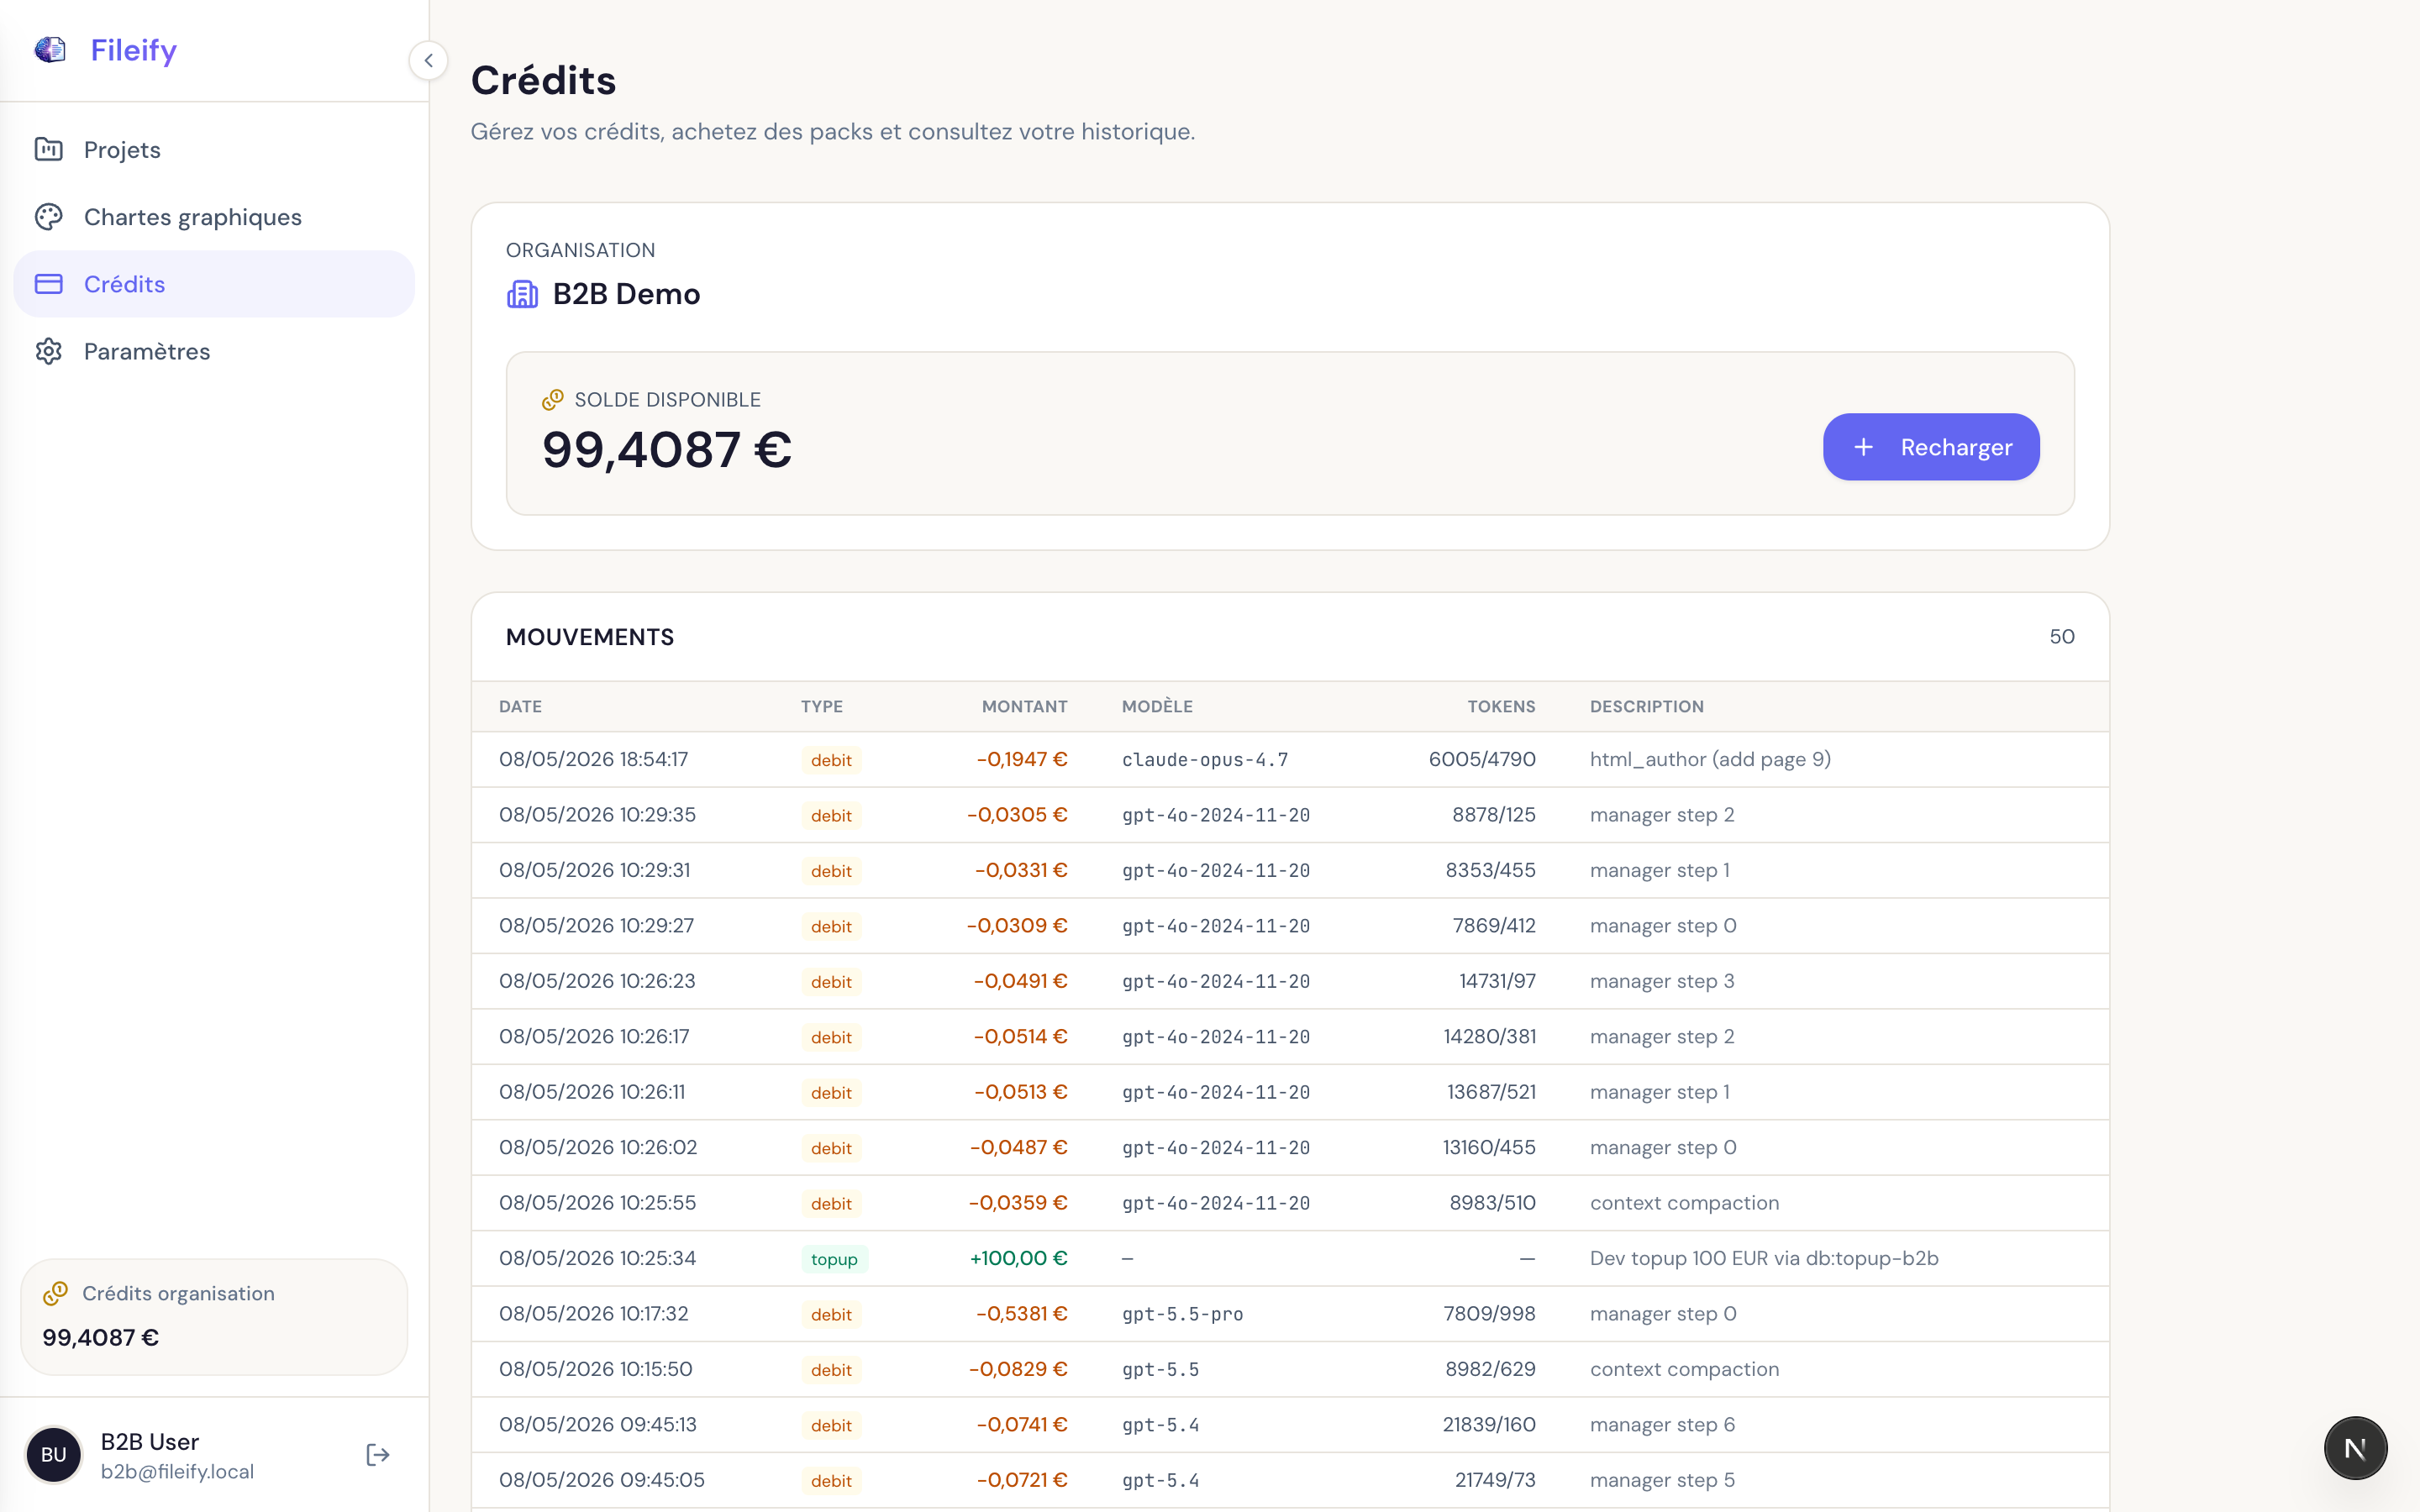
The transactions table gives, per row:
- the date and type (
debit,topup,refund) - the amount in euros
- the model billed (
claude-opus-4.7,gpt-4o-2024-11-20,gpt-5.5-pro, etc.) - the tokens consumed (
input/output) - a readable description (
html_author (add page 9),manager step 0,context compaction)
Every agent tool call is traced separately. You'll see a single page creation cost one html_author debit (Claude writing the HTML) plus several manager step N debits (GPT orchestrating). Top-ups show up in green with a provenance note — here a 100 € dev top-up.
Clicking Top up opens the pack purchase flow. The balance is shared: every Pro member of the organisation draws from the same pool.
Step 6 — Tune your account settings
The last tab, Settings, holds individual settings (your profile, language, OAuth links) rather than organisation-wide configuration.
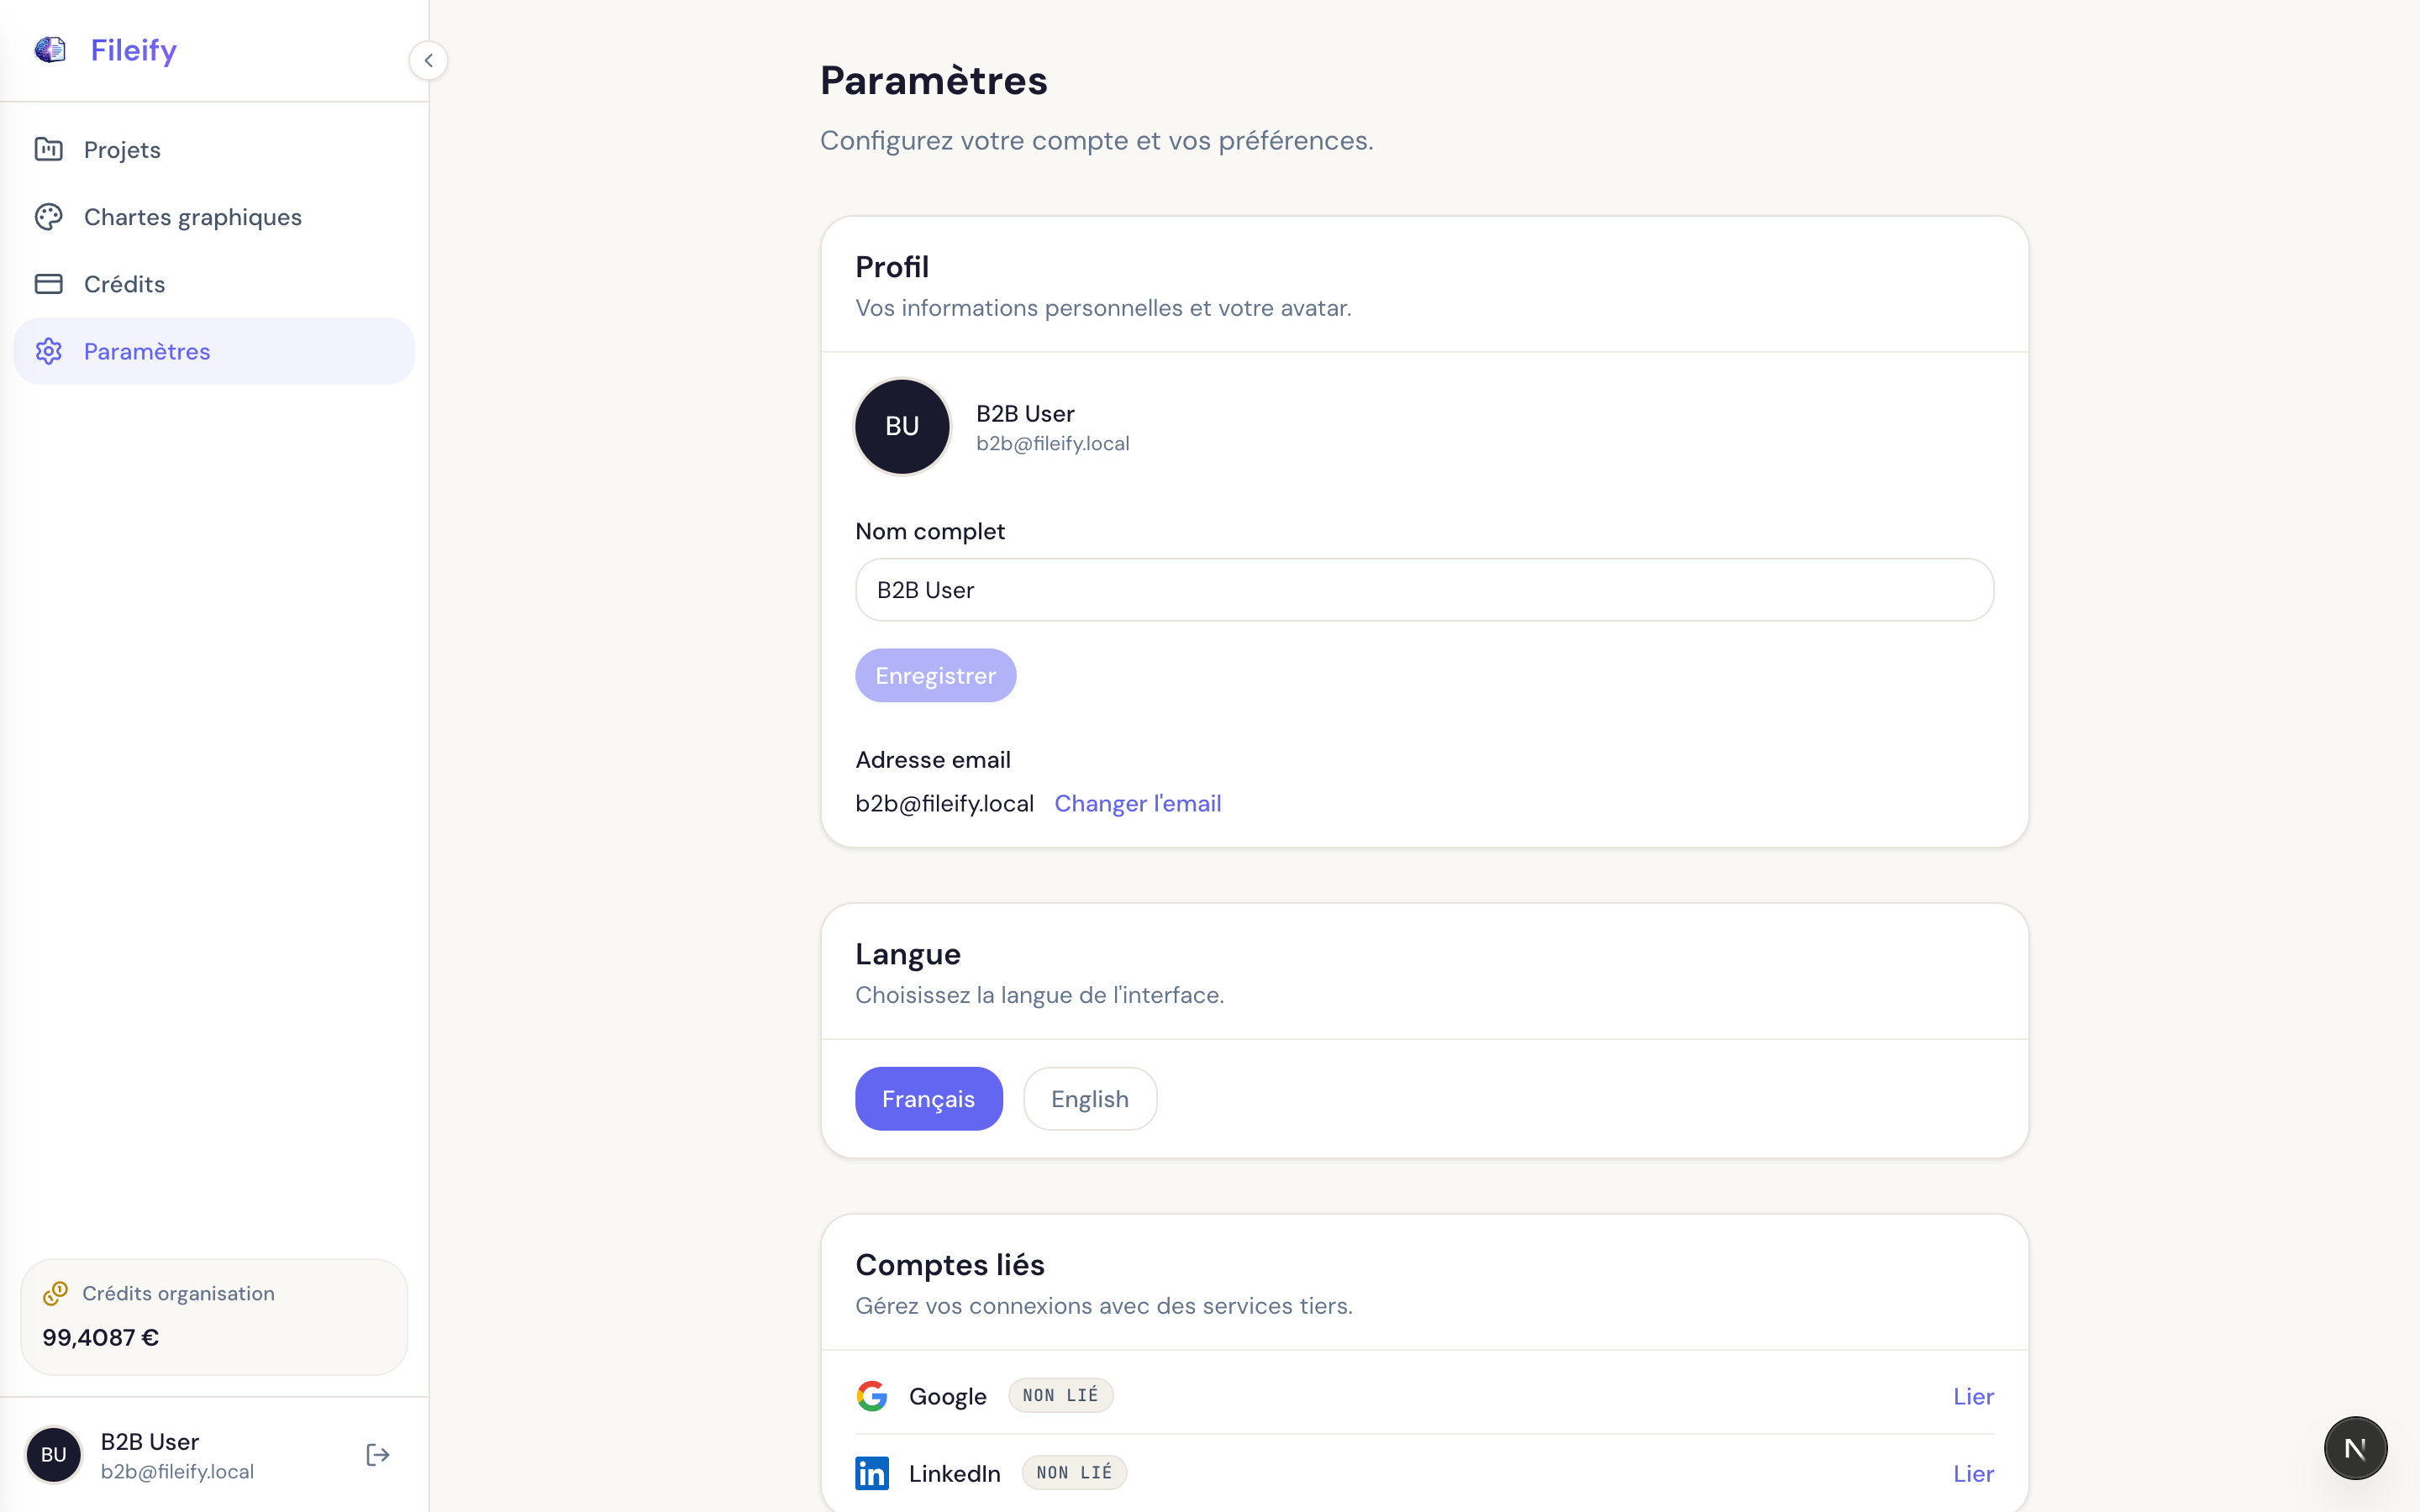
Three main cards:
- Profile — full name, avatar, email address (email change goes through a verification flow)
- Language — toggle
Français / English. This switches both the UI and the default language of agent prompts: anEnglishuser talks to the agent in English, the agent replies in English and generates English documents. - Linked accounts — Google and LinkedIn for OAuth. Useful if your organisation moves from password to social login.
Best practices for starting a Pro project
Do
- Create the brand kit before the first project — saves you from re-styling every document afterwards
- Write a precise project brief in the description: the agent re-reads it on every turn
- Use the project memo (
update_project_memo) to lock brand invariants ("never yellow", "always sign with the logo bottom-right") - Top up the organisation balance before a big session — a 10-page booklet typically costs 0.50–1.50 € depending on the models
- Watch the transactions table after a dispatch: a
html_authorrepeating on the same page often signals a poorly framed brief
Don't
- Launch a 30-page booklet in a single message: prefer "First build the cover and TOC, we'll continue from there" — the agent stays sharper on shorter scopes
- Override AI models on every project "for comfort": leave
Inherit from accountunless you have a documented reason - Skip manual editing: for 5 words to fix, three clicks beats burning a credit debit
- Confuse the project memo (brand, lasting constraints) with the document memo (notes for one specific booklet): they coexist and aren't re-read in the same contexts
Ready to launch your first booklet?
The Studio is built for teams that produce at volume: marketing, product documentation, internal communication. The ideal workflow — kit → project → first document with the agent → manual finishing → PDF export — fits in under thirty minutes once the kit is in place. If your Pro organisation isn't activated yet, get in touch to open access and set up your credits.